In this post, we will dive into the details of setting up a WooCommerce web store.
- Section 1: Introduction – Your Journey to E-commerce Success with WooCommerce
- Section 2: Setting Up the Foundation (WordPress and Hosting)
- Section 3: Installing and Configuring WooCommerce
- Section 4: Product Management – Filling Your Store Shelves
- Section 5: Setting Up Shipping and Taxes – Delivering and Calculating with Confidence
- Section 6: Payment Gateways – Accepting Payments Seamlessly
- Section 7: Choosing and Customizing a Theme – The Face of Your Store
- Section 8: Essential WooCommerce Settings – Fine-Tuning Your Store's Engine
- Section 9: Testing and Launching Your Store – Ready for Business!
- Section 10: Post-Launch and Ongoing Maintenance – Nurturing Your Online Store
- Section 11: Conclusion – Your E-commerce Journey Begins Now
- Section 12: Bonus! WooCommerce Setup Video Guide
Section 1: Introduction – Your Journey to E-commerce Success with WooCommerce
Welcome to the exciting world of e-commerce! This comprehensive guide will walk you through the process of building your own online store using WooCommerce Malaysia, the most popular e-commerce platform for WordPress. Whether you’re a budding entrepreneur, a small business owner looking to expand your reach, or simply someone with a great idea to share with the world, WooCommerce offers the flexibility and power you need to create a thriving online business.
What is WooCommerce?
WooCommerce is a powerful, open-source plugin that seamlessly integrates with WordPress, the world’s leading content management system. Think of WordPress as the foundation of your website, and WooCommerce as the engine that transforms it into a fully functional online store. This combination allows you to not only sell products and services but also manage your website’s content, blog, and other essential elements all in one place.
Why Choose WooCommerce?
In the vast landscape of e-commerce platforms, WooCommerce stands out for several compelling reasons:
- Flexibility and Customization: WooCommerce is highly customizable. You have complete control over the look and feel of your store, from design to functionality. With thousands of themes and extensions available, you can tailor your store to perfectly match your brand and cater to your specific business needs.
- Open-Source and Free: The core WooCommerce plugin is free to use. While you might invest in premium themes or extensions, the initial setup cost is significantly lower compared to proprietary platforms.
- Large and Supportive Community: WooCommerce boasts a massive community of users and developers. This means you’ll find ample resources, tutorials, and support forums to help you along the way. If you encounter a problem, chances are someone has already solved it.
- Scalability: Whether you’re starting small or planning for rapid growth, WooCommerce can scale with your business. As your customer base and product catalog expand, you can easily add more features and handle increased traffic.
- Integration with WordPress: Being deeply integrated with WordPress offers a significant advantage. You can leverage the power of WordPress’s content management capabilities to create engaging product descriptions, blog posts, and other content that drives traffic and boosts sales.
What You’ll Need:
Before we dive into the setup process, let’s outline the essential components you’ll need to get started:
- Domain Name: Your online store’s address (e.g., www.yourstore.com). This is how customers will find you.
- Web Hosting: A service that stores your website’s files and makes them accessible on the internet. Think of it as the “home” for your online store.
- WordPress Installation: The foundation upon which you’ll build your store. Most hosting providers offer easy one-click WordPress installations.
- WooCommerce Plugin: The plugin that adds e-commerce functionality to your WordPress website.
We’ll discuss each of these components in more detail in the following sections, providing guidance on choosing the right options for your business.
Who is this guide for?
This guide is designed for anyone who wants to create an online store using WooCommerce, regardless of their technical expertise. We’ll break down the process into easy-to-follow steps, providing clear instructions and helpful tips along the way. Whether you’re a beginner or have some experience with WordPress, you’ll find this guide a valuable resource.
Overview of the Process:
Setting up a WooCommerce store involves several key stages:
- Setting up the foundation (domain, hosting, and WordPress).
- Installing and configuring the WooCommerce plugin.
- Managing your products (adding, categorizing, etc.).
- Setting up shipping and taxes.
- Configuring payment gateways.
- Choosing and customizing a theme.
- Fine-tuning essential WooCommerce settings.
- Testing and launching your store.
- Post-launch maintenance and marketing.
We’ll cover each of these stages in detail in the following sections, providing you with a clear roadmap to e-commerce success. Let’s get started!
Section 2: Setting Up the Foundation (WordPress and Hosting)
Before you can unleash the power of WooCommerce, you need a solid foundation for your online store. This section covers the essential first steps: choosing a domain name, selecting a web hosting provider, and installing WordPress.
2.1 Choosing a Domain Name: Your Online Identity
Your domain name is your store’s online address – it’s how customers will find you. A good domain name is memorable, relevant to your business, and easy to spell. Here are some tips for choosing the perfect domain:
- Keep it Short and Simple: Shorter domain names are easier to remember and type.
- Use Relevant Keywords: If possible, include keywords related to your products or services.
- Choose the Right Extension:
.comis the most popular and widely recognized extension, but consider other options like.net,.org, or country-specific extensions if appropriate. - Avoid Hyphens and Numbers: These can make your domain name harder to remember and type.
- Check Availability: Use a domain registrar (like GoDaddy, Namecheap, or Google Domains) to see if your desired domain name is available.
Once you’ve chosen a domain name, you’ll need to register it through a domain registrar. This typically involves paying an annual fee to secure your domain name.
2.2 Selecting Web Hosting: The Home for Your Store
Web hosting is the service that stores your website’s files and makes them accessible on the internet. Choosing the right WordPress hosting provider is crucial for the performance, security, and reliability of your online store. Here are some key factors to consider:
- WooCommerce Compatibility: Ensure the hosting provider explicitly supports WooCommerce. They should have the necessary server resources and software (like PHP and MySQL) to run WooCommerce smoothly.
- SSL Certificate: An SSL certificate is essential for secure online transactions. It encrypts data transmitted between your website and your customers, protecting sensitive information like credit card details. Most reputable hosting providers offer free SSL certificates.
- Storage and Bandwidth: Choose a hosting plan with sufficient storage space for your website files, product images, and other data. Bandwidth refers to the amount of data that can be transferred between your website and visitors. Ensure you have enough bandwidth to handle your expected traffic.
- Uptime and Reliability: Look for a hosting provider with a high uptime guarantee (ideally 99.9% or higher). This ensures your website is available to visitors most of the time.
- Customer Support: Choose a hosting provider with responsive and helpful customer support in case you encounter any issues.
There are different types of hosting available, including shared hosting, VPS hosting, and dedicated hosting. For new WooCommerce stores, shared hosting is often a good starting point. As your business grows, you might need to upgrade to a more powerful hosting solution. Research different hosting providers and compare their plans and features before making a decision. Some popular and WooCommerce-friendly hosting providers include Bluehost, SiteGround, and WP Engine.
2.3 Installing WordPress: The Foundation of Your Store
Once you have your domain name and web hosting, it’s time to install WordPress. Many hosting providers offer one-click WordPress installations, which make the process incredibly easy. If your hosting provider doesn’t offer a one-click install, you can manually install WordPress by downloading the WordPress files and uploading them to your hosting server. Most hosting providers have documentation to guide you through the process.
2.4 Navigating the WordPress Dashboard: Your Control Center
After installing WordPress, you’ll be greeted with the WordPress dashboard. This is the control center for your website, where you’ll manage everything from content to settings. Familiarize yourself with the key sections of the dashboard:
- Dashboard: Provides an overview of your website, including recent activity and updates.
- Posts: Used for creating and managing blog posts.
- Media: Where you upload and manage images, videos, and other media files.
- Pages: Used for creating static pages like “About Us” or “Contact Us.”
- Comments: Manage comments left by visitors on your blog posts.
- Appearance: Customize the look and feel of your website by choosing and customizing themes.
- Plugins: Extend the functionality of your website by installing plugins.
- Users: Manage user accounts and permissions.
- Settings: Configure various settings for your website.
Understanding the WordPress dashboard is essential for managing your WooCommerce store. Take some time to explore the different sections and get comfortable with the interface. In the next section, we’ll dive into installing and configuring the WooCommerce plugin.
Section 3: Installing and Configuring WooCommerce
With your WordPress foundation in place, it’s time to add the e-commerce engine: WooCommerce! This section guides you through installing the WooCommerce plugin and configuring its basic settings.
3.1 Installing the WooCommerce Plugin: Adding E-commerce Power
Installing WooCommerce is a straightforward process thanks to the WordPress plugin repository. Here’s how:
- Log in to your WordPress dashboard.
- Navigate to Plugins > Add New.
- Search for “WooCommerce” in the search bar.
- Locate the WooCommerce plugin (it should be the first result, with over 5 million active installations).
- Click “Install Now.” WordPress will download and install the plugin.
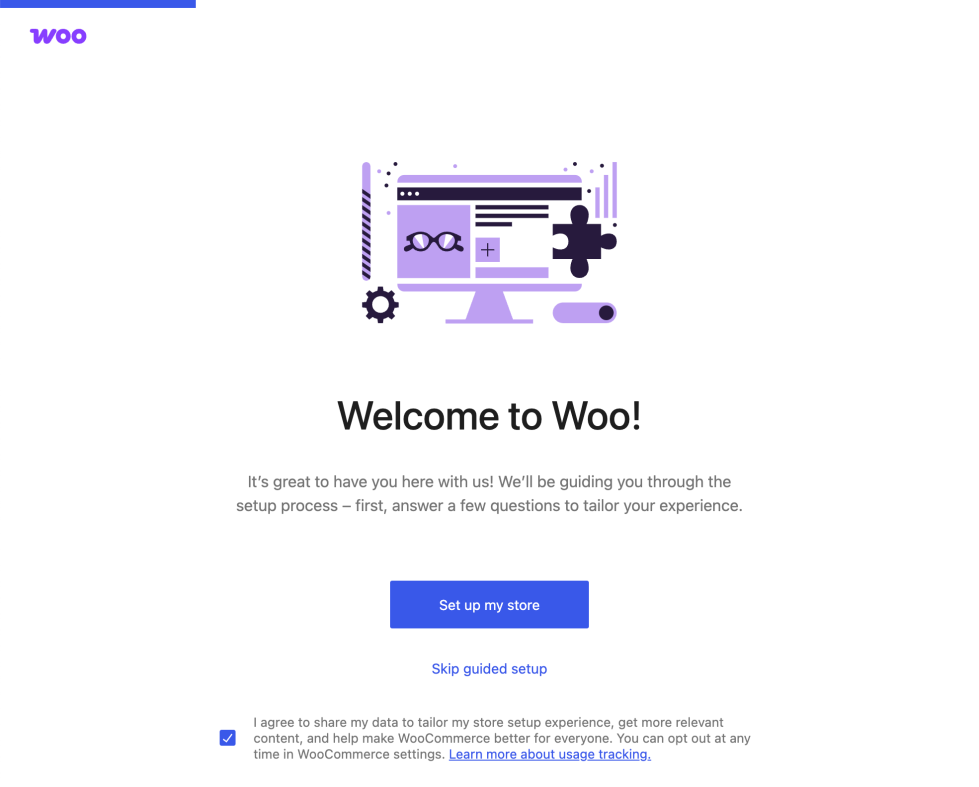
- Click “Activate.” This will activate the WooCommerce plugin and launch the WooCommerce Setup Wizard.
3.2 Running the WooCommerce Setup Wizard: Your Store’s Foundation
The WooCommerce Setup Wizard will guide you through the initial configuration of your store. It’s crucial to complete this wizard carefully as it sets the foundation for your store’s operations.
- Store Details: Enter your store’s address, including country, state/province, and postcode. This information is essential for calculating taxes and shipping rates.
- Industry: Select the industry your business operates in. This helps WooCommerce suggest relevant features and settings.
- Product Types: Choose the types of products you plan to sell (e.g., physical products, digital downloads, services). This helps WooCommerce tailor the setup process.
- Business Details: Provide information about your business, such as whether you’re selling to consumers or businesses. This information is important for tax and legal compliance.
- Theme: The wizard may suggest some WordPress block themes suitable for your store. You can choose one now or skip this step and select a theme later (we’ll cover themes in detail in a later section).
- Payment: The wizard will offer to connect you with payment gateways like Stripe and PayPal. You can set these up now or configure them later in the WooCommerce settings.
- Shipping: Configure basic shipping options, such as shipping zones and methods (flat rate, free shipping). You can refine these settings later as needed.
- Recommended: WooCommerce may recommend additional plugins or services. You can choose to install them or skip them for now.
Important Notes about the Setup Wizard:
- You can always go back and change these settings later in the WooCommerce settings menu.
- Don’t worry if you’re unsure about some settings. You can make your best guess now and adjust them later.
- The Setup Wizard is designed to get you started quickly. You’ll likely need to further customize your settings after completing the wizard.
3.3 Exploring the WooCommerce Settings: Fine-Tuning Your Store
After completing the Setup Wizard, you can access the full WooCommerce settings menu by navigating to WooCommerce > Settings in your WordPress dashboard. This is where you’ll fine-tune every aspect of your store. The settings are organized into several tabs:
- General: Basic store information, currency, location, etc.
- Products: Product display options, inventory management, etc.
- Shipping: Shipping zones, methods, options, etc.
- Payments: Payment gateway configuration and settings.
- Accounts & Privacy: Customer account settings, privacy policy, etc.
- Emails: Customize transactional emails sent to customers.
- Advanced: Advanced settings for developers and experienced users.
We’ll delve deeper into each of these settings tabs in later sections. For now, familiarize yourself with the menu and the different options available.
3.4 WooCommerce Status: Keeping an Eye on Things
The WooCommerce Status page (found under WooCommerce > Status) provides valuable information about your store’s setup and environment. It can help you identify potential issues and ensure everything is running smoothly. Pay attention to any warnings or errors displayed on this page.
By completing these steps, you’ve successfully installed and configured the basic settings for your WooCommerce store. You’re now ready to start adding products and customizing your store’s appearance. In the next section, we’ll cover the crucial aspect of product management.
Section 4: Product Management – Filling Your Store Shelves
With WooCommerce installed and configured, the heart of your online store is your products. This section provides a comprehensive guide to adding, managing, and organizing your products effectively.
4.1 Adding Products: Showcasing Your Offerings
Adding products is the core of running your WooCommerce store. Here’s a step-by-step guide:
- Navigate to Products > Add New: In your WordPress dashboard, go to the “Products” menu and click “Add New.”
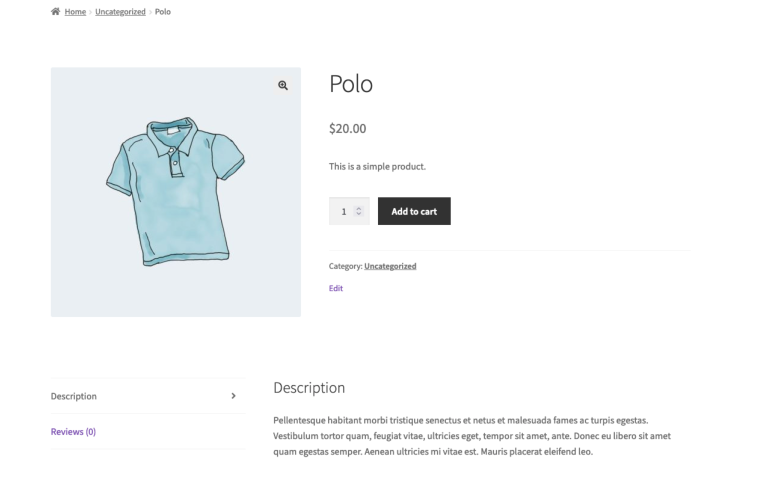
- Product Title and Description:
- Product Title: Enter a clear, concise, and descriptive title for your product. Use relevant keywords to improve search visibility.
- Product Description: Write a detailed and engaging description of your product. Highlight its features, benefits, and specifications. Use high-quality images and even videos to showcase your product.
- Product Data: This is where you configure the essential details of your product. Select the appropriate product type from the dropdown menu:
- Simple Product: A single product with no variations (e.g., a book, a t-shirt in one size and color).
- Grouped Product: A collection of related products that are sold together (e.g., a box set of DVDs).
- Variable Product: A product with variations (e.g., a t-shirt available in different sizes and colors).
- External/Affiliate Product: A product that you link to an external website (e.g., an affiliate product).
- Downloadable Product: A digital product that can be downloaded (e.g., an ebook, a software application).
- Virtual Product: A product that isn’t physical and doesn’t require shipping (e.g., a service, a course).
- General Product Data:
- Regular Price: The original price of your product.
- Sale Price: The discounted price of your product (optional).
- SKU (Stock Keeping Unit): A unique identifier for your product (optional, but recommended for inventory management).
- Inventory: Manage stock levels, enable backorders, and set low stock thresholds.
- Shipping: Set weight and dimensions for physical products.
- Linked Products: Upsell and cross-sell other products.
- Attributes (for Variable Products): Define attributes like size, color, or material. These attributes will be used to create product variations.
- Product Variations (for Variable Products): Create specific variations based on the attributes you defined. For example, a t-shirt might have variations for “Small – Red,” “Medium – Blue,” etc. Each variation can have its own price, SKU, and inventory.
- Product Short Description: A brief summary of your product that appears on product listing pages.
- Product Image and Gallery:
- Product Image: The main image for your product.
- Product Gallery: Additional images to showcase your product from different angles.
- Product Categories and Tags:
- Product Categories: Organize your products into categories (e.g., “Clothing,” “Electronics,” “Books”).
- Product Tags: Use tags to further categorize your products and make them easier to find (e.g., “T-shirt,” “Cotton,” “Summer”).
- Publish or Save as Draft: Once you’ve entered all the product information, click “Publish” to make your product live on your store. You can also save it as a draft if you’re not ready to publish it yet.
4.2 Product Descriptions: Telling the Story
Your product descriptions are crucial for convincing customers to buy. Here are some tips for writing effective product descriptions:
- Highlight Benefits, Not Just Features: Focus on how your product will benefit the customer.
- Use Clear and Concise Language: Avoid jargon and technical terms that your target audience might not understand.
- Tell a Story: Connect with your customers emotionally by telling a story about your product.
- Use High-Quality Images and Videos: Show your product in the best possible light.
- Include Social Proof: Add customer testimonials or reviews to build trust.
4.3 Product Images and Galleries: Visual Appeal
High-quality product images are essential for attracting customers and showcasing your products effectively. Here are some best practices:
- Use Professional-Looking Photos: Invest in professional photography if possible.
- Use High Resolution Images: Ensure your images are clear and sharp.
- Show Your Product from Different Angles: Provide multiple images to give customers a complete view of your product.
- Use a Consistent Style: Maintain a consistent style for all your product images.
- Optimize Images for Web: Compress your images to reduce file size and improve website loading speed.
4.4 Product Categories and Tags: Organization is Key
Organizing your products into categories and tags is essential for easy navigation and improved search visibility.
- Categories: Use categories to group similar products together.
- Tags: Use tags to further categorize your products and make them easier to find.
4.5 Managing Inventory: Keeping Track of Stock
Accurate inventory management is crucial for avoiding overselling and keeping your customers happy. WooCommerce provides built-in inventory management features that allow you to:
- Track Stock Levels: Set stock quantities for each product.
- Enable Backorders: Allow customers to purchase products that are currently out of stock.
- Set Low Stock Thresholds: Receive notifications when your stock levels are low.
4.6 Product Attributes and Variations: Catering to Choices
If you sell products with variations (e.g., size, color), you’ll need to use product attributes and variations. This allows customers to choose the specific version of the product they want to purchase.
By following these guidelines, you can effectively manage your products in WooCommerce and create a compelling online store that attracts customers and drives sales. In the next section, we’ll cover the important aspects of setting up shipping and taxes.
Section 5: Setting Up Shipping and Taxes – Delivering and Calculating with Confidence
Getting shipping and taxes right is crucial for a smooth and compliant e-commerce operation. This section guides you through configuring these essential elements in your WooCommerce store.
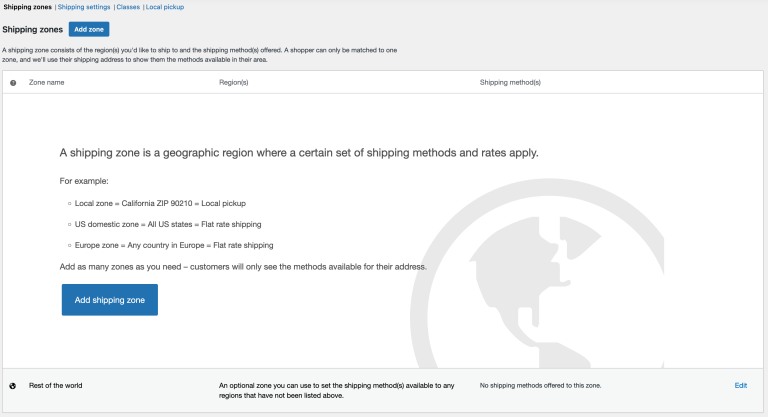
5.1 Configuring Shipping Zones: Defining Your Delivery Areas
Shipping zones are geographical areas where you offer different shipping methods and rates. Setting them up correctly is the first step in configuring your shipping.
- Navigate to WooCommerce > Settings > Shipping: In your WordPress dashboard, go to “WooCommerce,” then “Settings,” and click the “Shipping” tab.
- Add a Shipping Zone: Click the “Add shipping zone” button.
- Zone Name: Give your shipping zone a descriptive name (e.g., “United States,” “Europe,” “Local Delivery”).
- Zone Regions: Select the countries, states, or regions that belong to this zone. You can be as specific or as broad as you need to be.
- Add Shipping Methods: Within each zone, you can add different shipping methods. Click the “Add shipping method” button and choose from the available options:
- Flat Rate: A fixed shipping cost for all orders within the zone.
- Free Shipping: Offer free shipping within the zone.
- Local Pickup: Allow customers to pick up their orders from your physical location.
- Table Rate: (Requires a plugin) Allows for more complex shipping calculations based on weight, destination, and other factors.
- Real-time Carrier Calculations: (Requires a plugin or integration) Fetch shipping rates directly from carriers like USPS, FedEx, or UPS.
- Configure Shipping Methods: Once you’ve added a shipping method, you can configure its settings. For example, for “Flat Rate,” you can set the cost of shipping. For “Free Shipping,” you can set conditions (e.g., minimum order amount).
5.2 Setting Up Tax Calculations: Staying Compliant
Accurate tax calculations are essential for legal compliance and avoiding penalties. WooCommerce offers several ways to handle taxes:
- Navigate to WooCommerce > Settings > General: Go to “WooCommerce,” then “Settings,” and click the “General” tab.
- Enable Taxes: Check the box that says “Enable taxes.”
- Navigate to WooCommerce > Settings > Tax: Click the “Tax” tab.
- Standard Rates: This is where you’ll set up your tax rates. You can either manually enter the rates or import them using a CSV file. You’ll need to specify the tax rate for each region you’re selling to.
- Tax Options: Configure various tax settings, such as how taxes are calculated (based on the customer’s shipping address or billing address), how taxes are displayed on the product page and checkout page, and whether to include taxes in product prices.
- Additional Tax Classes: If you have different types of products that are taxed at different rates, you can create additional tax classes.
5.3 Shipping Classes: Handling Special Products
Shipping classes are used to group products that require special shipping handling (e.g., fragile items, oversized packages). You can then assign different shipping rates to each shipping class.
- Navigate to WooCommerce > Settings > Shipping > Shipping classes: Go to “WooCommerce,” then “Settings,” then “Shipping,” and click “Shipping classes”.
- Add a Shipping Class: Click the “Add shipping class” button.
- Name and Slug: Give your shipping class a name and a slug (a unique identifier).
- Assign Shipping Classes to Products: When editing a product, you can assign it to a specific shipping class.
5.4 Important Considerations for Shipping and Taxes:
- Shipping Plugins: For more advanced shipping features (e.g., real-time carrier calculations, table rates, package tracking), you might need to use a shipping plugin.
- Tax Plugins: For complex tax calculations or automated tax compliance, consider using a tax plugin.
- Shipping Carriers: If you’re using real-time carrier calculations, you’ll need to create accounts with the respective shipping carriers.
- Tax Laws: Familiarize yourself with the tax laws in the regions you’re selling to. Tax regulations can be complex, and it’s essential to stay compliant. Consult with a tax professional if needed.
By carefully configuring your shipping zones, tax rates, and shipping classes, you can ensure a smooth and accurate checkout experience for your customers while staying compliant with regulations. In the next section, we’ll cover the crucial topic of setting up payment gateways.
Section 6: Payment Gateways – Accepting Payments Seamlessly
Payment gateways are the bridge between your online store and your customers’ wallets. They securely process online payments, allowing you to accept credit cards, debit cards, and other payment methods. This section guides you through choosing and setting up Malaysia payment gateways for your WooCommerce store.
6.1 Choosing Payment Gateways: Offering Flexibility
Selecting the right payment gateways is crucial for providing a convenient and secure checkout experience for your customers. Consider the following factors:
- Popularity: Choose gateways that are widely used and trusted by your target audience.
- Transaction Fees: Each gateway charges transaction fees, which can vary depending on the payment method and transaction volume. Compare the fee structures of different gateways.
- Supported Currencies: Ensure the gateway supports the currencies you want to accept.
- Security: Choose gateways with robust security measures to protect sensitive customer data. Look for PCI DSS compliance.
- Ease of Integration: Select gateways that are easy to integrate with WooCommerce.
- Customer Support: Choose gateways with responsive and helpful customer support.
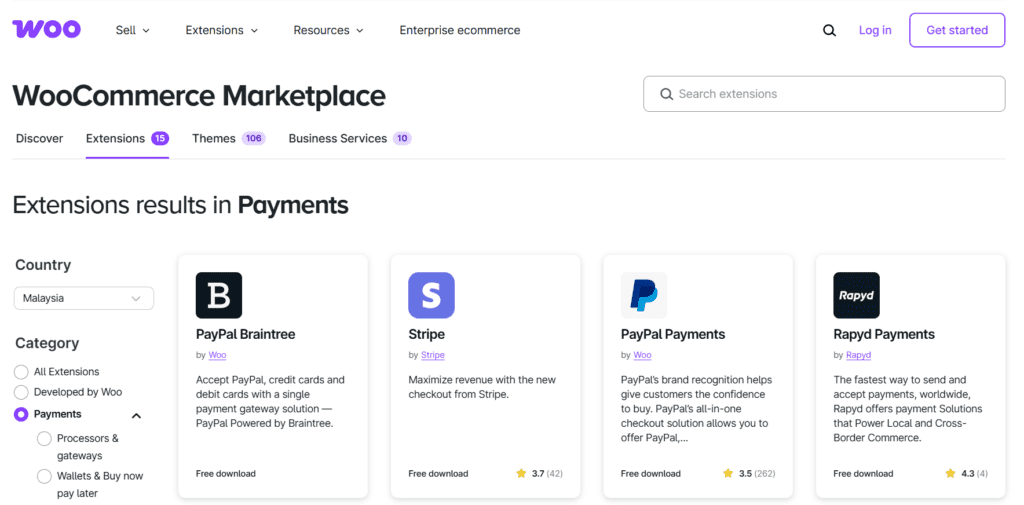
Some popular payment gateways for WooCommerce include:
- PayPal: A widely used and trusted payment gateway that allows customers to pay with their PayPal accounts or credit cards.
- Stripe: A popular payment gateway that supports a wide range of payment methods, including credit cards, debit cards, and Apple Pay.
- Square: A payment gateway that’s popular with small businesses and offers both online and in-person payment processing.
- Authorize.net: A well-established payment gateway that’s known for its security and reliability.
- WooCommerce Payments: WooCommerce’s own payment solution, offering convenient integration and competitive rates.
6.2 Integrating Payment Gateways: Connecting to Your Store
Once you’ve chosen your payment gateways, you’ll need to integrate them with your WooCommerce store. Here’s a general process:
- Install the Gateway Plugin (if necessary): Some payment gateways require a specific plugin to integrate with WooCommerce. You can find these plugins in the WordPress plugin repository.
- Navigate to WooCommerce > Settings > Payments: In your WordPress dashboard, go to “WooCommerce,” then “Settings,” and click the “Payments” tab.
- Enable the Gateway: Find the payment gateway you want to integrate and click the “Manage” button. Enable the gateway by checking the “Enable” box.
- Configure the Gateway Settings: Each gateway will have its own settings that you need to configure. This usually involves entering API keys, account details, and other credentials. Follow the instructions provided by the payment gateway.
- Test the Gateway: After configuring the gateway, it’s crucial to test it to ensure it’s working correctly. Most gateways provide a test mode that allows you to simulate transactions without actually processing real payments.
6.3 Testing Payment Gateways: Ensuring Smooth Transactions
Testing your payment gateways is essential for preventing issues during live transactions. Here are some things to test:
- Successful Transactions: Make sure you can successfully process payments using different payment methods.
- Failed Transactions: Test what happens when a transaction fails (e.g., due to insufficient funds or incorrect card details).
- Refunds: Test the refund process to make sure it works correctly.
- Different Currencies: If you’re accepting multiple currencies, test transactions in each currency.
6.4 Important Considerations for Payment Gateways:
- PCI DSS Compliance: If you’re handling credit card information directly on your website, you’ll need to be PCI DSS compliant. Using a reputable payment gateway can simplify this process.
- Security: Choose payment gateways with strong security measures to protect sensitive customer data.
- Fraud Prevention: Consider using fraud prevention tools to minimize the risk of fraudulent transactions.
- Customer Experience: Make sure the checkout process is smooth and easy for your customers.
- Mobile Optimization: Ensure your payment gateways are optimized for mobile devices.
By carefully selecting and configuring your payment gateways, you can provide a secure and convenient checkout experience for your customers, leading to increased sales and customer satisfaction. In the next section, we’ll discuss the crucial aspect of choosing and customizing a theme for your WooCommerce store.
Section 7: Choosing and Customizing a Theme – The Face of Your Store
Your theme is the visual foundation of your WooCommerce store. It controls the overall design, layout, and appearance of your website. Choosing the right theme and customizing it to match your brand is crucial for creating a professional and engaging online store.
7.1 Selecting a WooCommerce-Compatible Theme: The Right Fit
Not all WordPress themes are created equal when it comes to WooCommerce compatibility. It’s essential to choose a theme that’s specifically designed or optimized for WooCommerce. These themes will have built-in features and layouts that seamlessly integrate with WooCommerce’s functionality.
Here’s what to look for in a WooCommerce-compatible theme:
- WooCommerce Integration: The theme should have dedicated WooCommerce templates for product pages, shop pages, checkout pages, and other e-commerce related elements.
- Customization Options: Look for themes with flexible customization options that allow you to easily change colors, fonts, layouts, and other design elements.
- Responsive Design: Ensure the theme is responsive, meaning it will adapt to different screen sizes (desktops, tablets, and mobile phones).
- Performance: Choose a theme that’s optimized for speed and performance. A slow-loading theme can negatively impact your search engine rankings and customer experience.
- Reviews and Ratings: Check reviews and ratings from other users to get an idea of the theme’s quality and support.
Where to Find Themes:
- WordPress Theme Repository: The official WordPress theme repository offers a wide selection of free themes, some of which are WooCommerce compatible.
- Theme Marketplaces: Marketplaces like ThemeForest offer a vast collection of premium WooCommerce themes with advanced features and designs.
- Theme Developers: Many developers specialize in creating premium WooCommerce themes.

7.2 Installing and Activating a Theme: Bringing Your Design to Life
Once you’ve chosen a theme, you’ll need to install and activate it on your WordPress website.
- From the WordPress Dashboard: Navigate to Appearance > Themes.
- Add New: Click the “Add New” button.
- Upload Theme (if purchased): If you purchased a theme from a marketplace or developer, click “Upload Theme” and select the theme’s zip file.
- Install Now: If you’re installing a free theme from the WordPress repository, search for the theme and click “Install Now.”
- Activate: Once the theme is installed, click the “Activate” button to make it the active theme for your website.
7.3 Customizing the Theme: Making it Your Own
After activating your theme, you can customize it to match your brand and preferences. Most WooCommerce themes offer customization options through the WordPress Customizer.
- Navigate to Appearance > Customize: In your WordPress dashboard, go to “Appearance” and click “Customize.”
- Explore Customization Options: The Customizer will display a preview of your website on the right and a panel of customization options on the left. These options can vary depending on the theme, but they typically include:
- Site Identity: Change your website title, tagline, and logo.
- Colors: Customize the colors of your website’s elements.
- Fonts: Choose different fonts for your website’s text.
- Header and Footer: Customize the layout and content of your website’s header and footer.
- Homepage Settings: Configure the layout and content of your homepage.
- WooCommerce Settings: Customize the appearance of your product pages, shop pages, and other WooCommerce elements.
- Preview and Save: As you make changes in the Customizer, you can preview them in real-time. Once you’re happy with the changes, click the “Publish” button to save them.
7.4 Child Themes (Optional): Advanced Customization
If you plan to make significant customizations to your theme’s code, it’s recommended to create a child theme. A child theme inherits the styles and functionality of the parent theme, but it allows you to make changes without modifying the parent theme’s files. This is important because if you update the parent theme, your customizations will be overwritten.
Creating a child theme is a more advanced topic, and you might need some coding knowledge to do it effectively. There are plugins and tutorials available online that can help you create a child theme.
7.5 Theme Updates: Keeping Things Fresh
It’s important to keep your theme up to date. Theme updates often include bug fixes, security improvements, and new features. You can usually update your WordPress classic theme directly from your WordPress dashboard.
By carefully choosing and customizing your theme, you can create a visually appealing and user-friendly online store that reflects your brand and provides a positive shopping experience for your customers. In the next section, we’ll delve into essential WooCommerce settings that will allow you to fine-tune your store’s functionality.
Section 8: Essential WooCommerce Settings – Fine-Tuning Your Store’s Engine
With your theme in place, it’s time to dive into the essential WooCommerce settings that will allow you to fine-tune your store’s functionality and optimize the shopping experience for your customers. This section covers the most important settings you should configure.
8.1 General Settings: The Foundation of Your Store
These settings control the basic information about your store, including its location, currency, and general options.
- Navigate to WooCommerce > Settings > General: In your WordPress dashboard, go to “WooCommerce,” then “Settings,” and click the “General” tab.
- Store Address: Enter your store’s physical address. This is important for tax calculations and shipping.
- General Options:
- Selling Location(s): Specify the countries or regions you’re selling to.
- Default Customer Location: Set the default location for customers who visit your site.
- Currency: Choose the currency you’ll be using for transactions.
- Currency Options: Configure how currency is displayed (e.g., symbol position, decimal separator).
- Thousand Separator: Choose the character used to separate thousands in prices.
- Decimal Separator: Choose the character used to separate decimals in prices.
- Number of Decimals: Set the number of decimals to display in prices.
8.2 Products Settings: Managing Your Product Catalog
These settings control how your products are displayed and managed.
- Navigate to WooCommerce > Settings > Products: Go to “WooCommerce,” then “Settings,” and click the “Products” tab.
- General:
- Shop Page: Select the page you want to use as your main shop page.
- Catalog Visibility: Control who can see your products (e.g., everyone, logged-in users only).
- Default Product Sorting: Set the default way products are sorted on the shop page (e.g., by popularity, by price).
- Display:
- Product Images: Configure the size of product images.
- Add to Cart Behavior: Control what happens when a customer adds a product to their cart.
- Inventory:
- Enable Stock Management: Enable or disable stock management for your products.
- Hold Stock (for unpaid orders): Specify how long to hold stock for unpaid orders.
- Notifications: Configure low stock and out-of-stock notifications.
- Downloadable Products: Configure how downloadable products are delivered to customers.
8.3 Shipping Settings: Fine-Tuning Your Delivery Options
These settings provide more granular control over your shipping configurations.
- Navigate to WooCommerce > Settings > Shipping: Go to “WooCommerce,” then “Settings,” and click the “Shipping” tab.
- Shipping Zones: (Covered in detail in Section 5) Review and adjust your shipping zones and methods.
- Shipping Options:
- Calculations: Control how shipping costs are calculated.
- Shipping Destination: Determine where shipping costs are calculated based on (customer address).
- Hide shipping costs until an address is entered: Choose to hide shipping costs until the customer inputs their address.
- Shipping Classes: (Covered in detail in Section 5) Review and manage your shipping classes.
8.4 Payments Settings: Managing Your Payment Gateways
These settings allow you to manage the payment gateways you’ve integrated with your store.
- Navigate to WooCommerce > Settings > Payments: Go to “WooCommerce,” then “Settings,” and click the “Payments” tab.
- Manage Payment Gateways: Review and configure the settings for each payment gateway you’ve enabled. (Covered in detail in Section 6).
8.5 Accounts & Privacy Settings: Customer Accounts and Legal Compliance
These settings control customer account creation and privacy-related options.
- Navigate to WooCommerce > Settings > Accounts & Privacy: Go to “WooCommerce,” then “Settings,” and click the “Accounts & Privacy” tab.
- Guest Checkout: Allow customers to checkout without creating an account.
- Account Creation: Configure account creation options.
- Privacy Policy: Link to your privacy policy page.
- Personal Data Retention: Configure how long to retain customer data.
8.6 Emails Settings: Customizing Transactional Emails
These settings allow you to customize the transactional emails that are sent to customers (e.g., order confirmations, shipping updates).
- Navigate to WooCommerce > Settings > Emails: Go to “WooCommerce,” then “Settings,” and click the “Emails” tab.
- Manage Emails: Review and customize the email templates for each type of notification.
8.7 Advanced Settings: For Experienced Users
The Advanced settings tab contains more technical options that are typically used by developers or experienced WooCommerce users. Unless you’re comfortable with these settings, it’s generally best to leave them at their default values.
By carefully configuring these essential WooCommerce settings, you can optimize your store’s functionality, create a seamless shopping experience for your customers, and ensure your store is operating smoothly and efficiently. In the next section, we’ll cover the crucial steps of testing and launching your WooCommerce store.
Section 9: Testing and Launching Your Store – Ready for Business!
You’ve built your WooCommerce store, configured the settings, and added your products. Now it’s time for the final stage: testing and launching! This section outlines the crucial steps to ensure everything works flawlessly before you open your virtual doors to the public.
9.1 Thorough Testing: The Key to a Smooth Launch
Testing is paramount. A thorough testing phase will help you identify and fix any issues before they impact your customers. Don’t rush this process! Here’s a comprehensive testing checklist:
- Product Pages:
- Accuracy: Verify all product details (descriptions, prices, variations, images) are accurate and up-to-date.
- Functionality: Test all product options and variations. Ensure customers can select options and add products to the cart without issues.
- Mobile Responsiveness: Check how product pages look and function on different devices (desktops, tablets, smartphones).
- Shopping Cart:
- Adding Products: Test adding products to the cart, changing quantities, and removing products.
- Cart Calculations: Verify that cart totals, including shipping and taxes, are calculated correctly.
- Coupon Codes: If you offer coupon codes, test them thoroughly to ensure they’re applied correctly.
- Checkout Process:
- Guest Checkout: If enabled, test the guest checkout process.
- Account Creation: Test the account creation process if you require or allow customer accounts.
- Payment Gateways: Crucial: Test all your payment gateways with test or sandbox accounts. Simulate successful and failed transactions. Verify that order confirmations are sent correctly.
- Shipping Options: Test all your shipping methods and zones. Ensure shipping costs are calculated accurately based on the customer’s location and order details.
- Order Confirmation: Confirm that order confirmation emails are sent to customers with all the necessary details.
- Mobile Responsiveness: Test the entire checkout process on different devices.
- User Experience (UX):
- Navigation: Ensure your website navigation is clear and easy to use. Customers should be able to find products easily.
- Search Functionality: Test the search bar to ensure it returns relevant results.
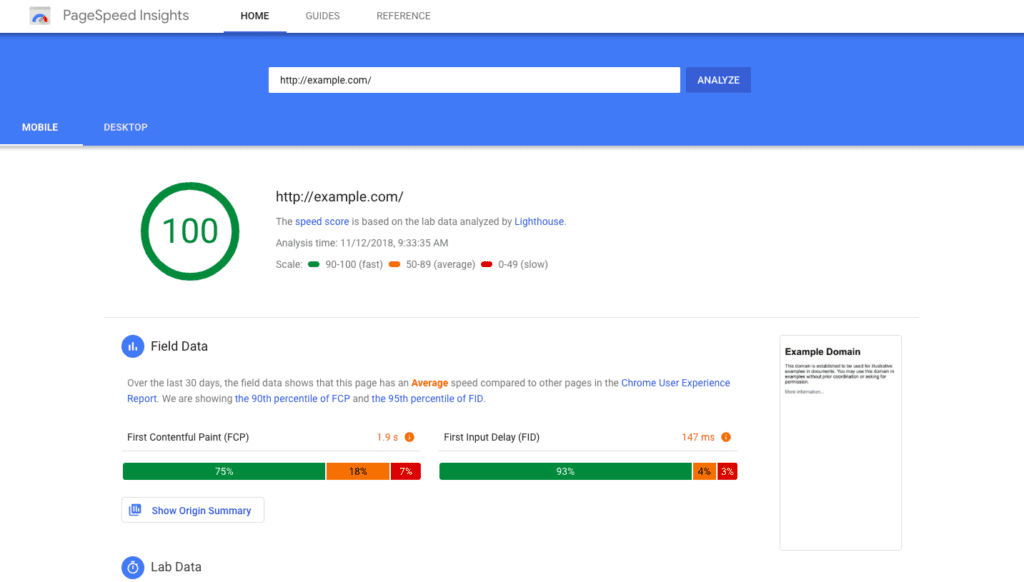
- Page Load Speed: Check the loading speed of your website, especially your product pages and checkout page. Use tools like Google PageSpeed Insights to identify areas for improvement.
- Overall Design: Ensure the website design is consistent and visually appealing across all pages.
- Email Notifications:
- Order Confirmations: Test order confirmation emails to ensure they contain all the necessary information.
- Shipping Updates: Test shipping update emails.
- Other Notifications: Test any other automated email notifications (e.g., password resets, low stock alerts).
- Legal Pages:
- Privacy Policy: Ensure your privacy policy page is accurate and up-to-date.
- Terms and Conditions: Verify that your terms and conditions page is complete and legally sound.
- Refund Policy: Make sure your refund policy is clear and easy to understand.
9.2 Pre-launch Checklist: Ticking All the Boxes
Before you officially launch your store, make sure you’ve completed the following pre-launch checklist:
- Backup Your Website: Create a full backup of your website, including your database and files. This is crucial in case something goes wrong after launch.
- Install Google Analytics: Set up Google Analytics to track your website traffic and sales data.
- Set Up Google Search Console: Set up Google Search Console to monitor your website’s performance in Google search results.
- Optimize for SEO: Make sure your website is optimized for search engines (e.g., using relevant keywords, optimizing product descriptions).
- Test on Different Browsers: Test your website on different web browsers (e.g., Chrome, Firefox, Safari, Edge) to ensure it displays correctly.
- Mobile Optimization: Double-check that your website is fully responsive and mobile-friendly.
- SSL Certificate: Verify that your SSL certificate is installed and active. Your website should display “https://” in the address bar.
- Contact Information: Ensure your contact information (email address, phone number) is prominently displayed on your website.
9.3 Launching Your Store: Going Live!
Once you’ve completed all the testing and pre-launch checks, you’re ready to launch your WooCommerce store!
- Disable Test Mode: Make sure you’ve disabled any test modes or sandbox settings for your payment gateways.
- Announce Your Launch: Tell the world about your new online store! Share the news on social media, send out email newsletters, and consider running launch promotions.
- Monitor Your Store: After launching, closely monitor your website for any issues. Check your analytics to track traffic and sales.
9.4 Post-Launch: Ongoing Maintenance and Growth
Launching your store is just the beginning. Here’s what you should do after launch:
- Regular Updates: Keep WordPress, WooCommerce, and all your plugins up to date.
- Security Monitoring: Implement security measures to protect your store from hackers and malware.
- Performance Optimization: Continuously monitor your website’s performance and make improvements as needed.
- Marketing and Promotion: Implement a marketing strategy to drive traffic and sales to your store.
- Customer Support: Provide excellent customer support to build loyalty and encourage repeat business.
By following these steps, you can ensure a successful launch for your WooCommerce store and set yourself up for long-term growth and success in the exciting world of e-commerce. Good luck!
Section 10: Post-Launch and Ongoing Maintenance – Nurturing Your Online Store
Congratulations! You’ve launched your WooCommerce store. But the journey doesn’t end there. This section emphasizes the importance of post-launch activities and ongoing website maintenance to ensure your store’s continued success, security, and growth.
10.1 Monitoring Performance: Keeping a Pulse on Your Store
Regularly monitoring your store’s performance is crucial for identifying areas for improvement and ensuring a smooth customer experience. Here’s what to keep an eye on:
- Website Traffic: Use Google Analytics to track your website traffic. Monitor the number of visitors, page views, bounce rate, and other key metrics. Identify which pages are most popular and which ones need improvement.
- Sales Data: Track your sales data to monitor revenue, conversion rates, average order value, and other important metrics. Identify trends and patterns to optimize your sales strategy.
- Conversion Rate: This is the percentage of visitors who make a purchase. A low conversion rate could indicate issues with your website design, product descriptions, or checkout process.
- Bounce Rate: This is the percentage of visitors who leave your website after viewing only one page. A high bounce rate could suggest problems with your website’s content or navigation.
- Page Load Speed: Monitor your website’s loading speed. A slow-loading website can negatively impact your search engine rankings and customer experience. Use tools like Google PageSpeed Insights to identify areas for improvement.
- Search Engine Rankings: Track your website’s ranking in search engine results pages (SERPs) for relevant keywords. This will help you assess the effectiveness of your SEO efforts.
10.2 Regular Updates: Keeping Everything in Sync
Keeping your WordPress core, WooCommerce plugin, themes, and other plugins up to date is essential for security, performance, and compatibility.
- WordPress Core Updates: WordPress core updates often include security patches, bug fixes, and new features.
- WooCommerce Updates: WooCommerce updates may include new features, performance improvements, and compatibility updates with the latest version of WordPress.
- Theme Updates: Theme updates can include design improvements, bug fixes, and compatibility updates.
- Plugin Updates: Plugin updates often include security patches, bug fixes, and new features.
Best Practices for Updates:
- Back Up Your Website: Always back up your website before performing any updates. This will allow you to restore your website if something goes wrong.
- Test Updates in a Staging Environment: If possible, test updates in a staging environment (a copy of your website) before applying them to your live website.
- Update Regularly: Don’t wait too long to update your software. Regular updates are crucial for security and performance.
10.3 Security Best Practices: Protecting Your Store and Customers
Security is paramount for any online store. Here are some essential security best practices:
- Strong Passwords: Use strong and unique passwords for your WordPress administrator account and other user accounts.
- Two-Factor Authentication (2FA): Enable 2FA for your WordPress administrator account to add an extra layer of security.
- Limit Login Attempts: Use a plugin to limit the number of login attempts to prevent brute-force attacks.
- Website Firewall: Consider using a website firewall to protect your website from malicious traffic.
- Malware Scans: Regularly scan your website for malware and vulnerabilities.
- SSL Certificate: Ensure your SSL certificate is installed and active.
- Keep Software Updated: As mentioned earlier, keep all your software up to date.
- Secure Hosting: Choose a reputable hosting provider with strong security measures.
10.4 Backup and Restore: Your Safety Net
Regular backups are your safety net in case of a disaster (e.g., hacking, server crash, accidental deletion).
- Automated Backups: Set up automated backups of your website, including your database and files. Many hosting providers offer automated backup services.
- Offsite Backups: Store your backups in a secure offsite location (e.g., cloud storage) to protect them from local disasters.
- Regular Backups: How often you back up your website depends on how frequently you make changes. For active stores, daily backups are recommended.
- Test Restores: Periodically test restoring your website from a backup to ensure the backup process is working correctly.
10.5 Marketing Your Store: Driving Traffic and Sales
Ongoing marketing is essential for driving traffic and sales to your online store. Here are some effective marketing strategies:
- Search Engine Optimization (SEO): Optimize your website for search engines to improve your visibility in search results.
- Social Media Marketing: Promote your store on social media platforms to reach a wider audience.
- Email Marketing: Build an email list and send out newsletters and promotional emails to your subscribers.
- Paid Advertising: Consider running paid advertising campaigns on Google Ads or social media to target specific audiences.
- Content Marketing: Create valuable content (blog posts, articles, videos) to attract visitors to your website and establish your expertise.
- Affiliate Marketing: Partner with other websites or influencers to promote your products.
10.6 Customer Support: Building Loyalty
Providing excellent customer support is crucial for building customer loyalty and encouraging repeat business.
- Responsive Support: Respond to customer inquiries promptly and professionally.
- Multiple Channels: Offer multiple support channels (e.g., email, phone, live chat) to make it easy for customers to reach you.
- Helpful Resources: Create helpful resources (e.g., FAQs, tutorials) to answer common customer questions.
- Proactive Support: Reach out to customers proactively to offer assistance or ask for feedback.
By implementing these post-launch and ongoing maintenance practices, you can ensure your WooCommerce store remains secure, performs optimally, and continues to grow and thrive in the competitive world of e-commerce. Remember, building a successful online store is an ongoing process that requires dedication, effort, and a commitment to continuous improvement.
Section 11: Conclusion – Your E-commerce Journey Begins Now
Congratulations! You’ve reached the end of this comprehensive guide to setting up your WooCommerce store. From laying the foundation with WordPress and hosting to launching your online storefront and planning for ongoing growth, you’ve covered a lot of ground. You now possess the knowledge and tools to bring your e-commerce vision to life.
Building a successful online store is an exciting and rewarding endeavor. While this guide has provided a structured roadmap, remember that the world of e-commerce is constantly evolving. Don’t be afraid to experiment, adapt, and learn new things along the way. The key is to stay engaged with your store, listen to your customers, and continuously strive to improve the shopping experience.
This journey is not just about setting up a store; it’s about building a business. It’s about connecting with your customers, providing valuable products or services, and creating a brand that resonates with your target audience. The technical setup is just the first step. The real work begins with marketing your store, providing excellent customer service, and continuously optimizing your operations.
Remember the key takeaways from this guide:
- Plan Carefully: A well-thought-out plan is essential for success. Define your target audience, choose the right products, and develop a solid marketing strategy.
- Focus on User Experience: Make it easy for customers to find your products, navigate your website, and complete a purchase.
- Prioritize Security: Protect your store and your customers’ data by implementing strong security measures.
- Stay Updated: Keep your software up to date to ensure security, performance, and compatibility.
- Provide Excellent Customer Support: Happy customers are more likely to return and recommend your store to others.
- Continuously Learn and Adapt: The e-commerce landscape is constantly changing. Stay informed about new trends and technologies and be willing to adapt your strategies as needed.
This guide is just the beginning of your e-commerce journey. As you grow and learn, you’ll discover new tools, techniques, and strategies that will help you take your business to the next level. Don’t be afraid to explore, experiment, and ask for help when you need it. The WooCommerce community is vast and supportive, and there are countless resources available online to help you succeed.
We wish you all the best in your e-commerce endeavors! May your store be successful, your customers be happy, and your business dreams come true. Now, go forth and build your empire!
Section 12: Bonus! WooCommerce Setup Video Guide
Here’s a video guide on how to setup WooCommerce website.